Windows installation before 2.3.0
Warning
This installer is outdated and unmaintained.
You should use the new 2.3 branch now.
Get the installer
The file name convention is:
- fusioninventory-agent_windows-i386_
- FusionInventory Agent version (e.g: 2.2.5)
- a - (dash)
- the package revision. e.g: 2, for the 2nd installer generated for the 2.2.5 release
- .exe
The installer can be used either on 32 or 64 bit Windows.
Settings

- Enter the full URL to your server.
- You can configure a key word to be able to sort out your machine later (TAG).
Warning
A common mistake is to mix HTTP and HTTPS in URL.
Advanced settings
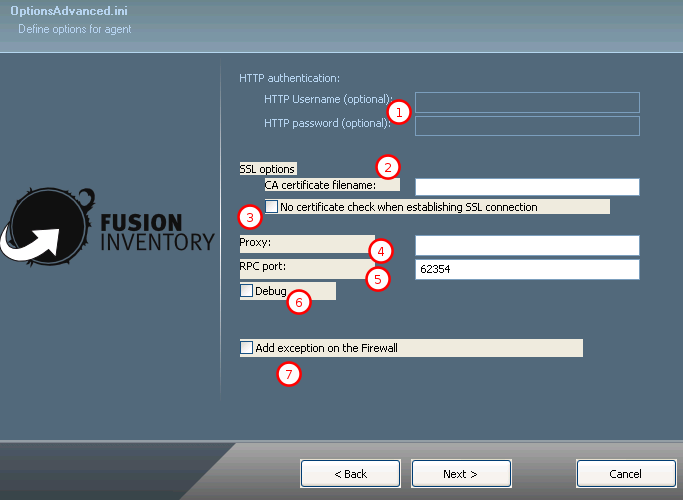
- Enter here an optional HTTP login and password. This is unrelated with GLPI.
- Enter the full path to you certificat file. This is important only if you use HTTPS.
- This check box will disable the HTTPS certificat check.
- You can configure here a HTTP proxy. For example, proxy:3128
- This is the port of the HTTP service of the agent. You need to change it on the server too.
- This check box will increase a lot the verbosity of the agent. The log is available in the agent-log.txt file.
- The installer can configure the Firewall for you if you want to allow connection on RPC port.
Info
Agent HTTP service is optional. It is only required if you want to be able to awake your agent to for an inventory or a job.
Installer command line parameters
/help                   Display this help. The space in front of /help is mandatory!
/S                      Run setup in silent mode
/installdir=dirname     Set installation directory of agent
/server=url1,url2       Set url of server
/tag=tagame             Set tag of agent
/user=username          Set username
/pass=password          Set password
/realm=realm            Set realm
/ca-cert-file=filename  Set filename of certificate
/no-ssl-check           No certificate check when establishing SSL connection
/proxy=http://proxy/    Set proxy
/debug                  Set debug mode
/rpc-port               Set RPC port number
/scan-homedirs          Look for virtual machines in home directories
/runnow                 Run agent after end of installation
/update-firewall        Update the Firewall to register the agent
/execmode=option        launch the agent with a service(service)/windows task scheduler(task)/or keep settings unchanged(none) (default is service)
Usage
To pass the parameters, do for example:
fusioninventory-agent_windows-i386_2.x.x-1.exe /S /debug /runnow /server=https://server1/glpi/plugins/fusioninventory/
this mean that i want to install fusioninventory in silent mode, run an inventory after installation, and send the inventory by https
fusioninventory-agent_windows-i386_2.x.x-1.exe /S /debug /runnow /server=http://server1/glpi/plugins/fusioninventory/
The same as above but with a plain http connection
And installation directory of the agent can be changed via command-line as below:
fusioninventory-agent_windows-i386_2.x.x-1.exe /S "/installdir=C:\Program Files\FusInv"
Edit Upgrade with FusionInventory Deploy
If you upgrade the agent with FusionInventory Deploy and the agent is launched with a Service, you will need an agent > 2.2.0-2 and the /execmode=none parameter. This way, the agent won't remove or add service or update the Tasks Scheduler setting. So you will keep the previous settings.